
In this article, I have described each and every step required for setting up a 2 node RAC12c database using virtual box for testing purpose.
Softwares Required:
1. Virtual box :
2. Linux
3. Oracle 12c home:
4. Oracle 12c Grid:
Virtual Machine setup:
Here we have to set up 2 nodes inside virtual box. So reduce our work, we will build one node and then clone the same to other nodes.
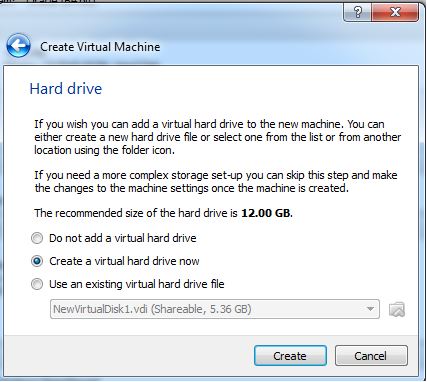
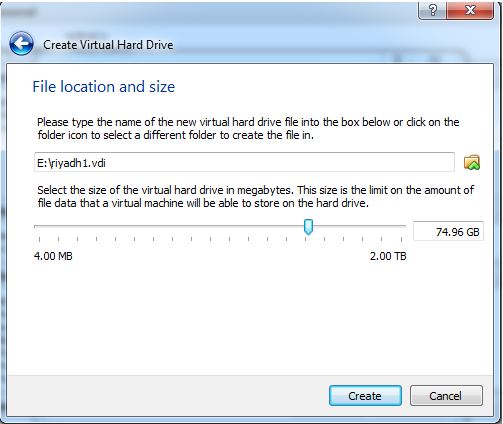
1. Open virtual box


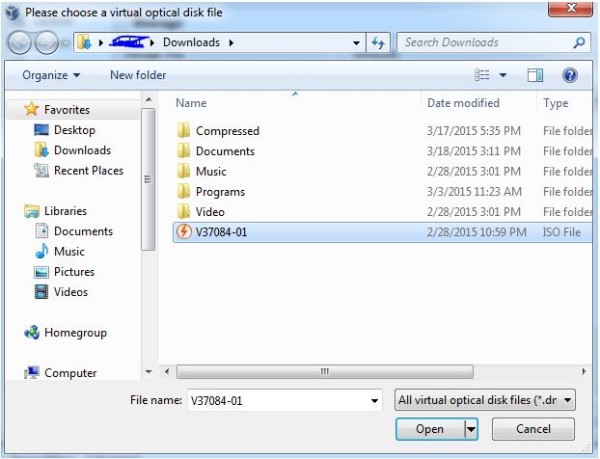
3. Choose the Linux iso file for installation:


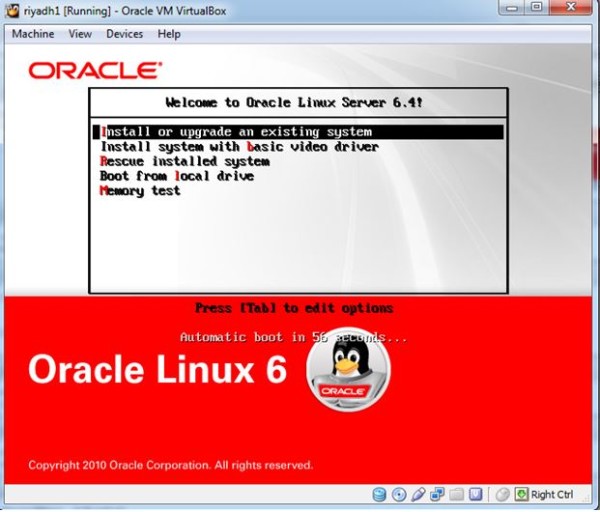
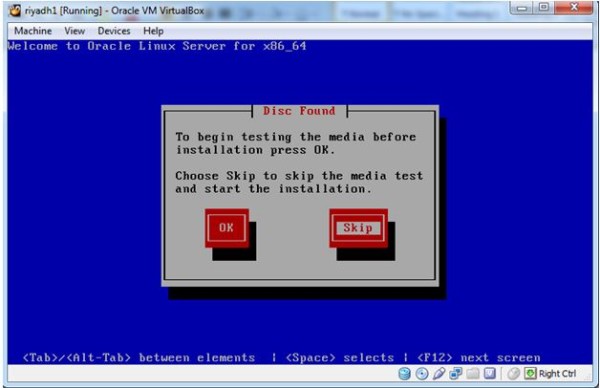
4.Start the Linux installation:


After selecting Server administrative tools, click on OPTIONAL PACKAGES. Make sure you select oracle rdbms and oracleasm packages.


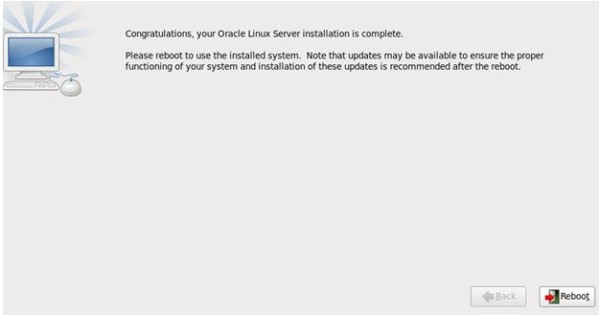

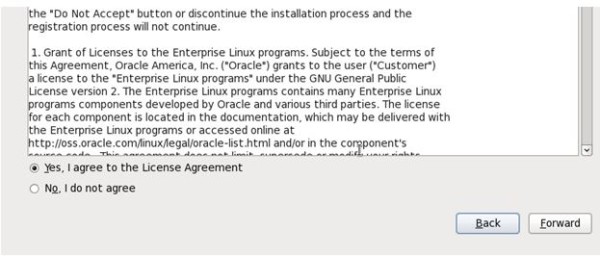

Now your Linux installation is done.
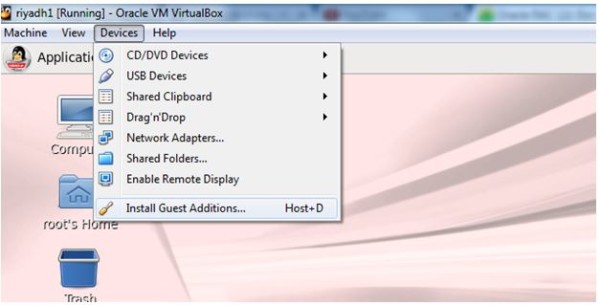
5. Install guest addition
The guest addition helps in keyboard and mouse integration.


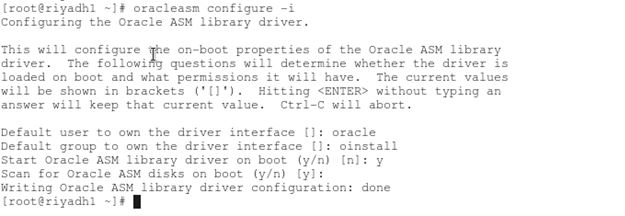
6. Configure oracleasm lib.
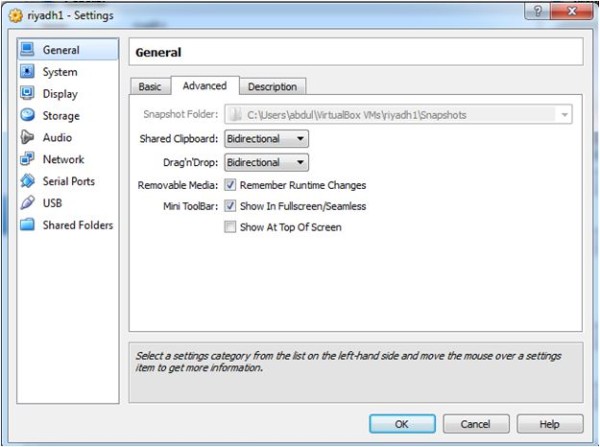
7.Go to settings and change both to bidirectional.
8.Now create user groups and set a password for oracle user:
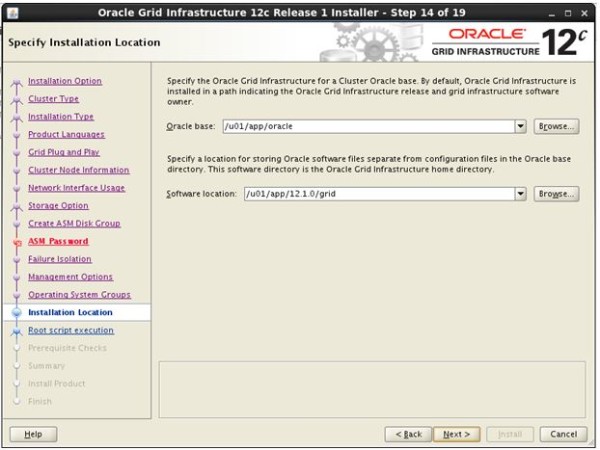
[root@riyadh1 ~]# mkdir -p /u01/app/12.1.0/grid_1
[root@riyadh1 ~]# mkdir -p /u01/app/oracle
[root@riyadh1 ~]# chown -R oracle:oinstall /u01
[root@riyadh1 ~]# chown oracle:oinstall /u01/app/oracle
[root@riyadh1 ~]# chmod -R 775 /u01/
[root@riyadh1 ~]# usermod -G dba,vboxsf oracle
[root@riyadh1 ~]#
[root@riyadh1 ~]#
[root@riyadh1 ~]#
[root@riyadh1 ~]#
[root@riyadh1 ~]# passwd oracle
Changing password for user oracle.
New password:
BAD PASSWORD: it is based on a dictionary word
BAD PASSWORD: is too simple
Retype new password:
passwd: all authentication tokens updated successfully.
[root@riyadh1 ~]#
9.Now disable the firewall:
Go to SYSTEM – > ADMINISTRATION -> FIREWALL


10.Disable selinux mode to disable from enabled in config file.
vi /etc/selinux/config
# This file controls the state of SELinux on the system.
# SELINUX= can take one of these three values:
# enforcing – SELinux security policy is enforced.
# permissive – SELinux prints warnings instead of enforcing.
# disabled – No SELinux policy is loaded.
SELINUX=disabled
# SELINUXTYPE= can take one of these two values:
# targeted – Targeted processes are protected,
# mls – Multi Level Security protection.
SELINUXTYPE=targeted
11.Stop ntpd services:
[root@riyadh1 ~]# service ntpd stop
Shutting down ntpd: [FAILED]
[root@riyadh1 ~]# chkconfig ntpd off
[root@riyadh1 ~]# mv /etc/ntp.conf /etc/ntp.conf.orig
[root@riyadh1 ~]# yum clean all
Loaded plugins: refresh-packagekit, security
Cleaning repos: ol6_UEK_latest ol6_latest
Cleaning up Everything
[root@riyadh1 ~]#
Now we have to make the grid and oracle home software shareable with the virtual box. Shutdown the node1.

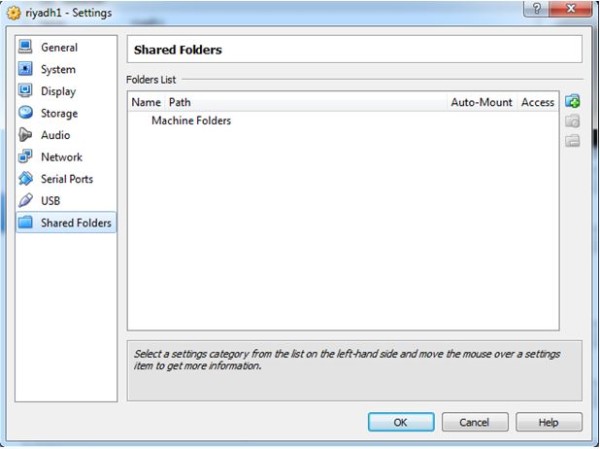

Once done start the node1 and login with oracle user.
[oracle@riyadh1 ~]$ su – root
Password:
[root@riyadh1 ~]# cd /media/sf_oracle_sw/
[root@riyadh1 sf_oracle_sw]# pwd
/media/sf_oracle_sw
[root@riyadh1 sf_oracle_sw]# ls -ltr
total 8
drwxrwx— 1 root vboxsf 4096 Jul 7 2014 grid
drwxrwx— 1 root vboxsf 4096 Mar 1 10:14 database
[root@riyadh1 sf_oracle_sw]#
Install cvfudisk:
Without cvuqdisk, Cluster Verification Utility is unable to discover shared disks, and you receive the error message “Package cvuqdisk not installed” when you run Cluster Verification Utility. Use the cvuqdisk rpm for your hardware (for example, x86_64, or i386).
[root@riyadh1 sf_oracle_sw]# cd /media/sf_oracle_sw/grid/rpm
[root@riyadh1 rpm]# CVUQDISK_GRP=oinstall; export CVUQDISK_GRP
[root@riyadh1 rpm]# rpm -Uvh cvuqdisk*
Preparing… ########################################### [100%]
Using default group oinstall to install package
1:cvuqdisk ########################################### [100%]
[root@riyadh1 rpm]#
Clone the existing node:
Now we will clone the existing node. i.e we will create node2 ( riyadh2 from riyadh1)
Shutdown the VM.
Go to MACHINE – > CLONE


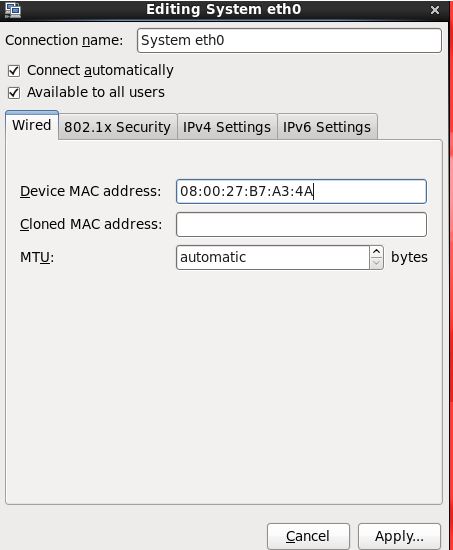
Now for riyadh2 (node 2) , we have to change the MAC address . Because MAC address is unique for each machine.
Just change the MAC address, by changing the last character of the address.
if it is 080027B7A349 . Then change it to 080027B7A34A. Do the same for both network adapters.


Now start both the nodes.
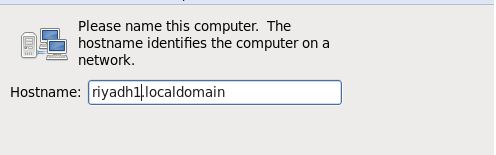
In node2 : change the hostname to riyadh2 in the network file.
[root@riyadh1 sysconfig]# vi /etc/sysconfig/network
change riyadh1 to riyadh2
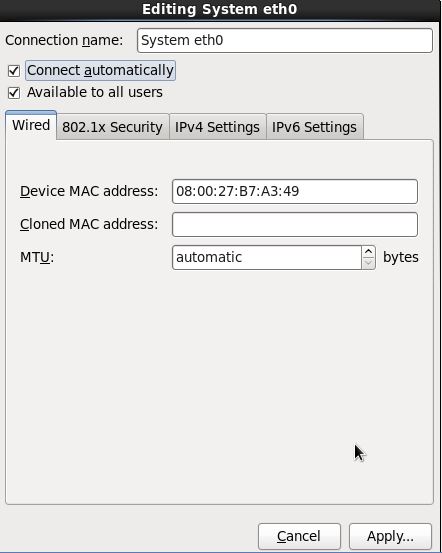
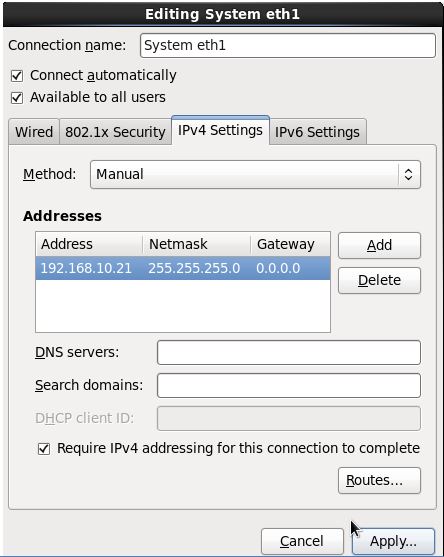
In VM2(riyadh2) go to SYSTEM – PREFERNCE – NETWORK CONNECTION. You will see something like this.

Remove Auto eth2 and Auto eth3

Now edit the mac adress to (080027B7A34A) which we set in the previous setup
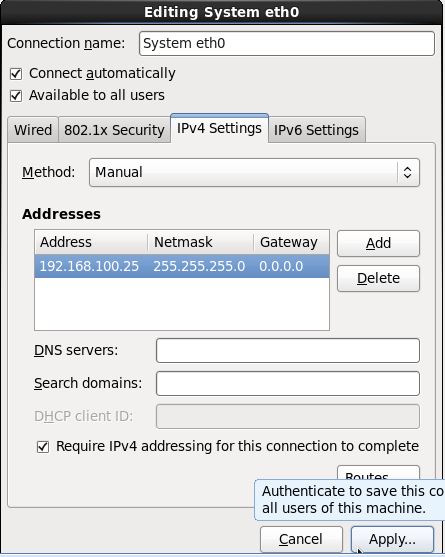
Set the new ips for node 2:

Do the same change ( mac address change and ip address change ) for other adapter ( eth1) also.
Lets change the ethernet port names.
The existing file will look like this.
cat /etc/udev/rules.d/70-persistent-net.rules
# This file was automatically generated by the /lib/udev/write_net_rules
# program, run by the persistent-net-generator.rules rules file.
#
# You can modify it, as long as you keep each rule on a single
# line, and change only the value of the NAME= key.
ATTR{address}==”08:00:27:b7:a3:49″, ATTR{type}==”1″, KERNEL==”eth*”, NAME=”eth0″
# PCI device 0x8086:0x100e (e1000)
# PCI device 0x8086:0x100e (e1000)
SUBSYSTEM==”net”, ACTION==”add”, DRIVERS==”?*”, ATTR{address}==”08:00:27:b7:a3:4a”, ATTR{type}==”1″, KERNEL==”eth*”, NAME=”eth2″
# PCI device 0x8086:0x100e (e1000)
SUBSYSTEM==”net”, ACTION==”add”, DRIVERS==”?*”, ATTR{address}==”08:00:27:94:dd:8c”, ATTR{type}==”1″, KERNEL==”eth*”, NAME=”eth3″
Remove the entries for eth0 and eth1 and rename eth2 to eth0 and eth3 to eth1.
Now the file should look like below.
[root@riyadh1 ~]# cat /etc/udev/rules.d/70-persistent-net.rules
# This file was automatically generated by the /lib/udev/write_net_rules
# program, run by the persistent-net-generator.rules rules file.
#
# You can modify it, as long as you keep each rule on a single
# line, and change only the value of the NAME= key.
# PCI device 0x8086:0x100e (e1000)
SUBSYSTEM==”net”, ACTION==”add”, DRIVERS==”?*”, ATTR{address}==”08:00:27:b7:a3:4a”, ATTR{type}==”1″, KERNEL==”eth*”, NAME=”eth0″
# PCI device 0x8086:0x100e (e1000)
SUBSYSTEM==”net”, ACTION==”add”, DRIVERS==”?*”, ATTR{address}==”08:00:27:94:dd:8c”, ATTR{type}==”1″, KERNEL==”eth*”, NAME=”eth1″
Reboot the VM2 to reflect the changes.
To confirm whether changes are done or not , we can run ifconfig.
[root@riyadh1 ~]# ifconfig
eth0 Link encap:Ethernet HWaddr 08:00:27:B7:A3:4A
inet addr:192.168.100.26 Bcast:192.168.100.255 Mask:255.255.255.0
inet6 addr: fe80::a00:27ff:feb7:a34a/64 Scope:Link
UP BROADCAST RUNNING MULTICAST MTU:1500 Metric:1
RX packets:9 errors:0 dropped:0 overruns:0 frame:0
TX packets:14 errors:0 dropped:0 overruns:0 carrier:0
collisions:0 txqueuelen:1000
RX bytes:650 (650.0 b) TX bytes:900 (900.0 b)
eth1 Link encap:Ethernet HWaddr 08:00:27:94:DD:8C
inet addr:192.168.10.22 Bcast:192.168.10.255 Mask:255.255.255.0
inet6 addr: fe80::a00:27ff:fe94:dd8c/64 Scope:Link
UP BROADCAST RUNNING MULTICAST MTU:1500 Metric:1
RX packets:10 errors:0 dropped:0 overruns:0 frame:0
TX packets:11 errors:0 dropped:0 overruns:0 carrier:0
collisions:0 txqueuelen:1000
RX bytes:700 (700.0 b) TX bytes:746 (746.0 b)
lo Link encap:Local Loopback
inet addr:127.0.0.1 Mask:255.0.0.0
inet6 addr: ::1/128 Scope:Host
UP LOOPBACK RUNNING MTU:16436 Metric:1
RX packets:16 errors:0 dropped:0 overruns:0 frame:0
TX packets:16 errors:0 dropped:0 overruns:0 carrier:0
collisions:0 txqueuelen:0
RX bytes:960 (960.0 b) TX bytes:960 (960.0 b)
[root@riyadh1 sysconfig]# cat /etc/sysconfig/network
NETWORKING=yes
HOSTNAME=riyadh2.localdomain
Add public, private,vip,scan host entries in /etc/hosts file of both node1 and node2.
So hosts file should look like below.
cat /etc/hosts
127.0.0.1 localhost localhost.localdomain localhost4 localhost4.localdomain4
::1 localhost localhost.localdomain localhost6 localhost6.localdomain6
# Private
192.168.10.21 riyadh1-priv.localdomain riyadh1-priv
192.168.10.22 riyadh2-priv.localdomain riyadh2-priv
# Public
192.168.100.25 riyadh1.localdomain riyadh1
192.168.100.26 riyadh2.localdomain riyadh2
# Virtual
192.168.100.35 riyadh1-vip.localdomain riyadh-vip
192.168.100.36 riyadh2-vip.localdomain riyadh-vip
# SCAN
192.168.100.45 riyadh-scan.localdomain riyadh-scan
192.168.100.46 riyadh-scan.localdomain riyadh-scan
192.168.100.47 riyadh-scan.localdomain riyadh-scan
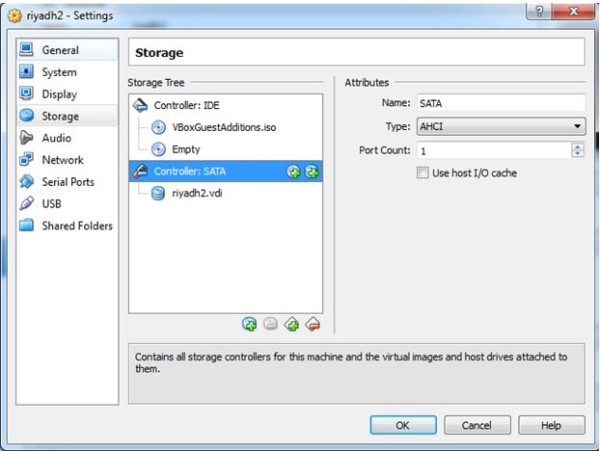
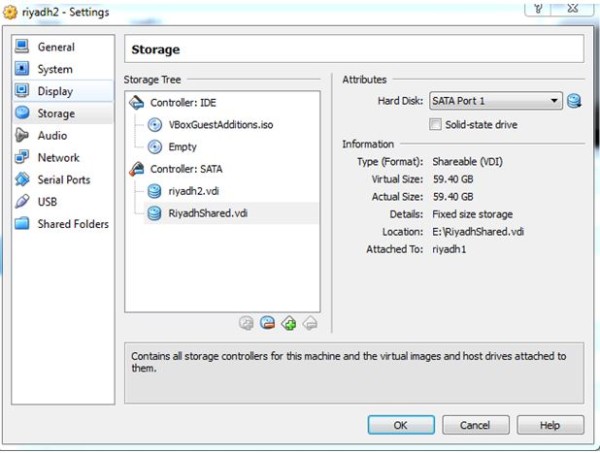
Now we will create a shared disk , which will be shared between both node1 and node2.


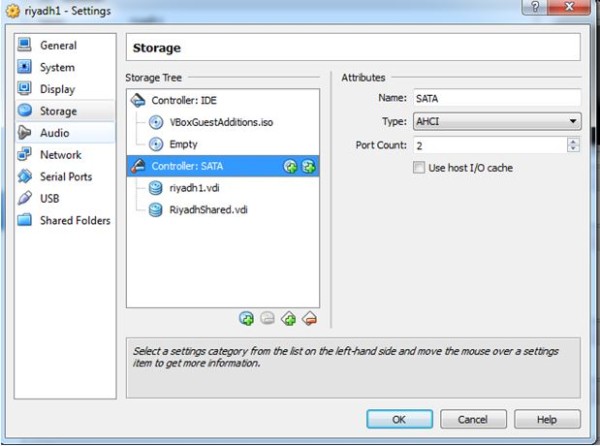
Now go to FILE – > VIRTUAL MEDIA MANAGER

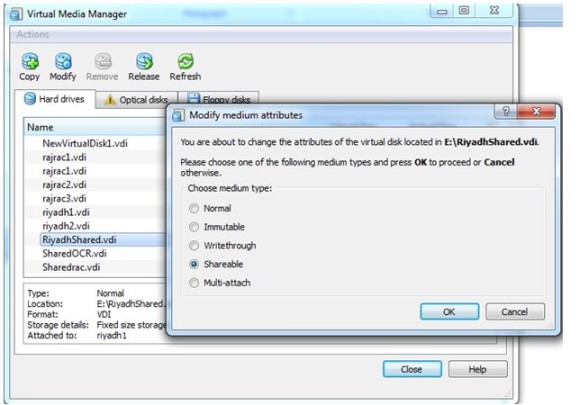
Now add the shared disk to node 2 also.

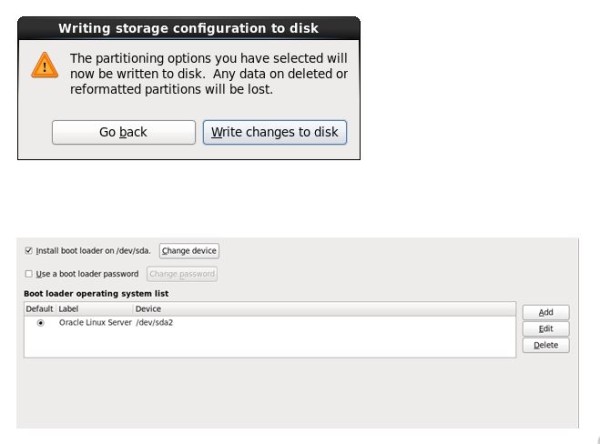
Now we will partition the shared storage to create asmdisks.
Start both the nodes and login to any of the nodes as root user.
[root@riyadh1 ~]# ls /dev/sd*
/dev/sda /dev/sda1 /dev/sda2 /dev/sda3 /dev/sda4 /dev/sda5 /dev/sdb
[root@riyadh1 ~]#
[root@riyadh1 ~]# fdisk /dev/sdb
Device contains neither a valid DOS partition table, nor Sun, SGI or OSF disklabel
Building a new DOS disklabel with disk identifier 0x4026c989.>
Changes will remain in memory only, until you decide to write them.
After that, of course, the previous content won’t be recoverable.
Warning: invalid flag 0x0000 of partition table 4 will be corrected by w(rite)
WARNING: DOS-compatible mode is deprecated. It’s strongly recommended to
switch off the mode (command ‘c’) and change display units to
sectors (command ‘u’).
Command (m for help): N
Command action
e extended
p primary partition (1-4)
p
Partition number (1-4): 1
First cylinder (1-7754, default 1): 1
Last cylinder, +cylinders or +size{K,M,G} (1-7754, default 7754):
Using default value 7754
Command (m for help): w
The partition table has been altered!
Calling ioctl() to re-read partition table.
Syncing disks.
[root@riyadh1 ~]# ls /dev/sd*
/dev/sda /dev/sda1 /dev/sda2 /dev/sda3 /dev/sda4 /dev/sda5 /dev/sdb /dev/sdb1
[root@riyadh1 ~]# oracleasm createdisk DISK1 /dev/sdb1
Writing disk header: done
Instantiating disk: done
[root@riyadh1 ~]# oracleasm scandisks
Reloading disk partitions: done
Cleaning any stale ASM disks…
Scanning system for ASM disks…
[root@riyadh1 ~]# oracleasm listdisks
DISK1
[root@riyadh1 ~]#
Now check in the other node:
[root@riyadh2 ~]# oracleasm scandisks
Reloading disk partitions: done
Cleaning any stale ASM disks…
Scanning system for ASM disks…
Instantiating disk “DISK1”
[root@riyadh2 ~]# oracleasm listdisks
DISK1
[root@riyadh2 ~]#
Now we can see the asm disk is visible to both the nodes.
Lets configure the ssh connectivity between both the nodes.
click on this link for ssh connectivity establishment.
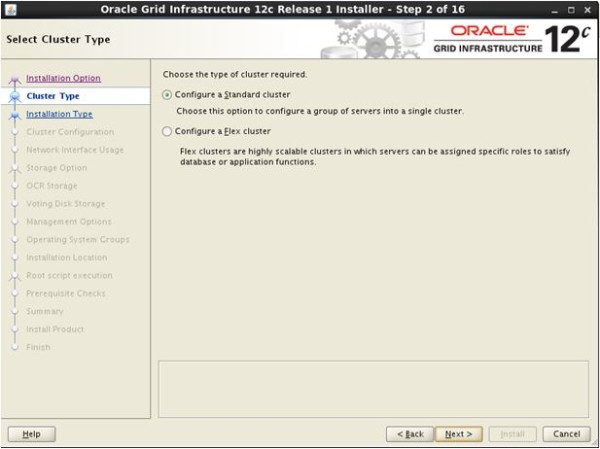
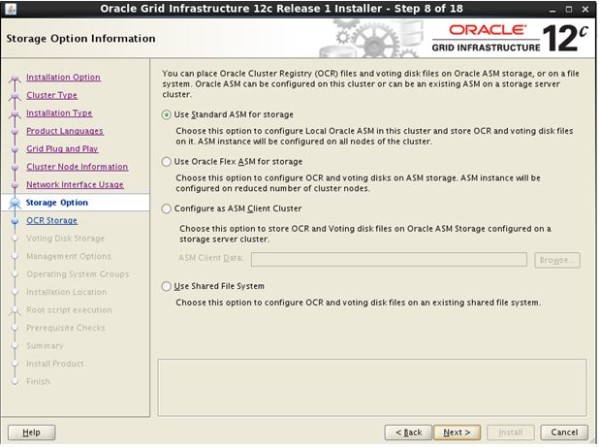
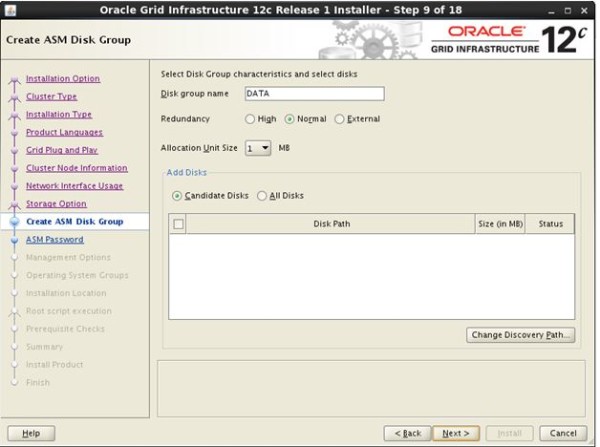
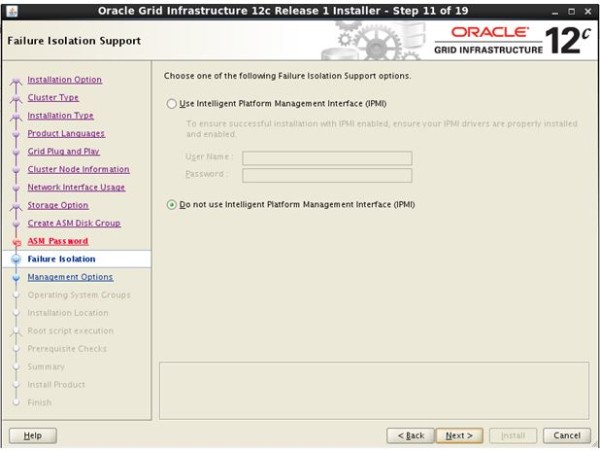
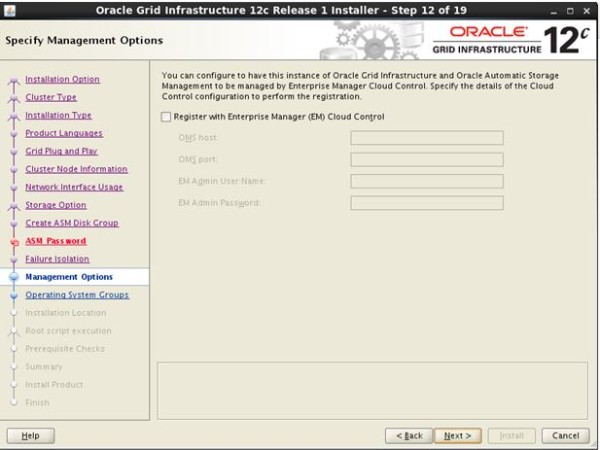
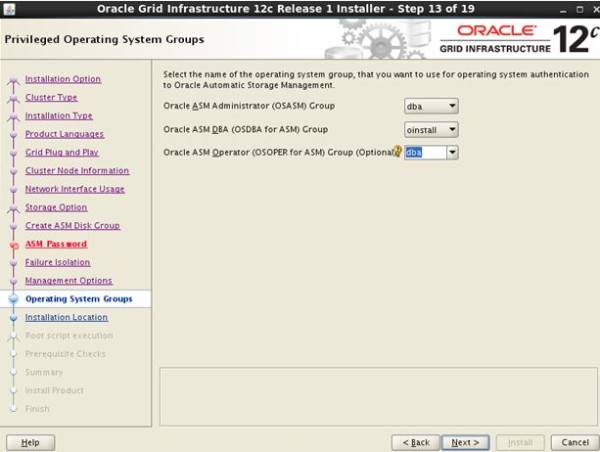
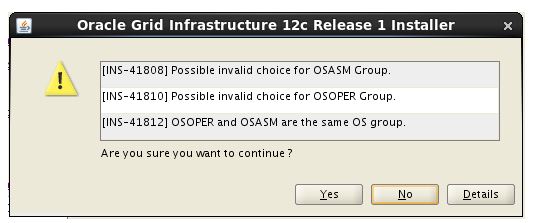
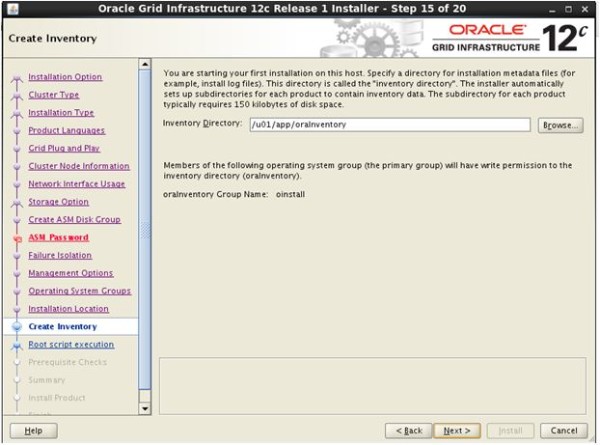
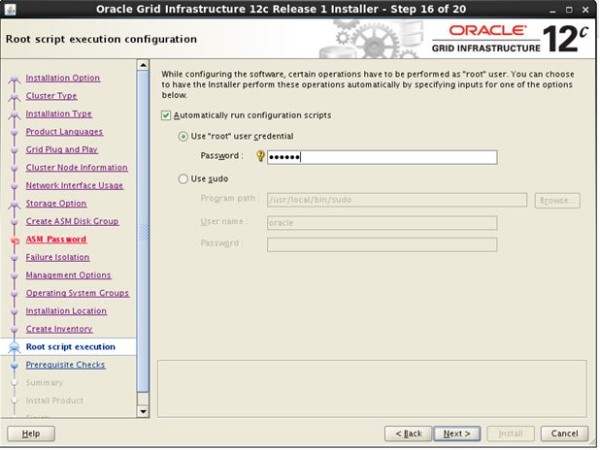
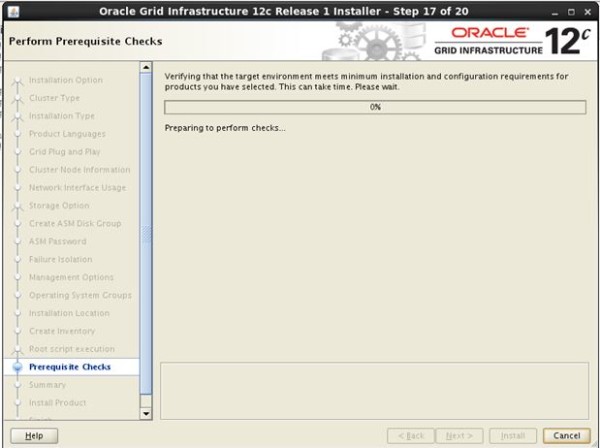
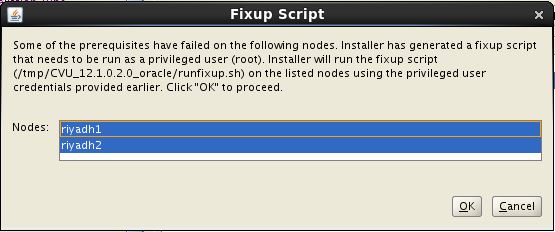
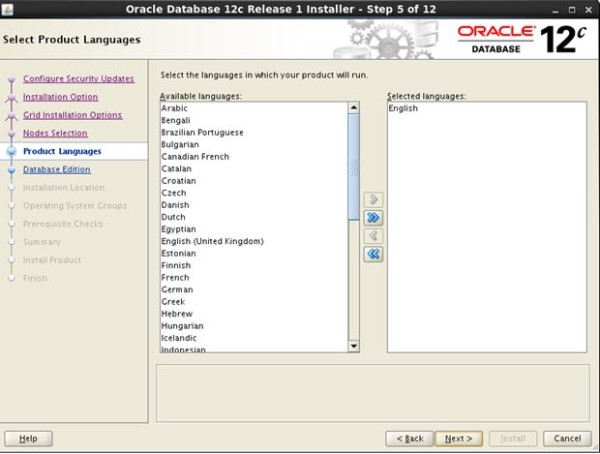
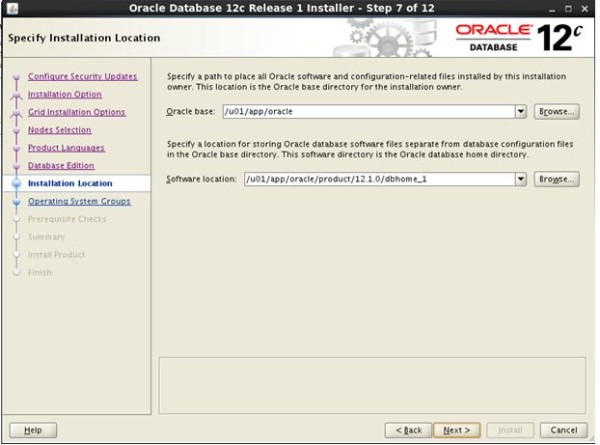
Lets proceed with GRID INSTALLATION:
Login to node 1 as oracle user
[oracle@riyadh1 ~]$ cd /media/sf_oracle_sw/grid/
[oracle@riyadh1 grid]$ ./runInstaller
Starting Oracle Universal Installer…
Checking Temp space: must be greater than 415 MB. Actual 24517 MB Passed
Checking swap space: must be greater than 150 MB. Actual 8999 MB Passed
Checking monitor: must be configured to display at least 256 colors. Actual 16777216 Passed
Preparing to launch Oracle Universal Installer from /tmp/OraInstall2015-03-18_02-42-21PM. Please wait …


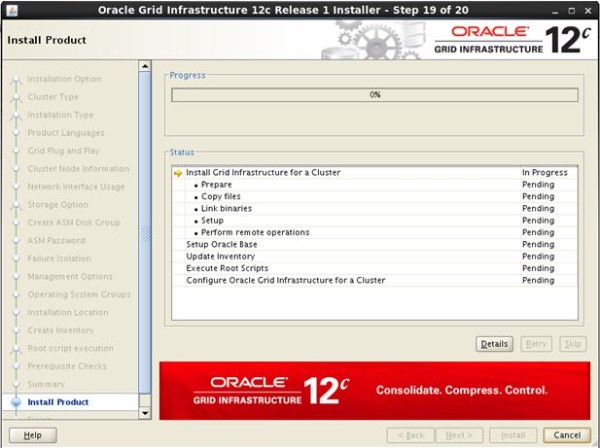


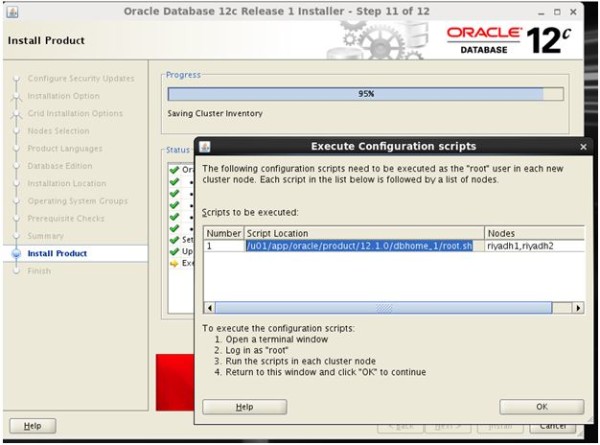
With this now our grid installation is done. Lets proceed with oracle binary installation.
Oracle rdbms installation:


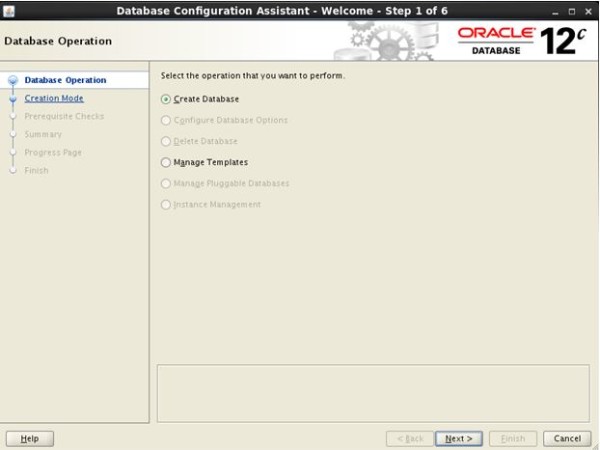
Now create a database.
Database creation
cd $ORACLE_HOME/bin
./dbca


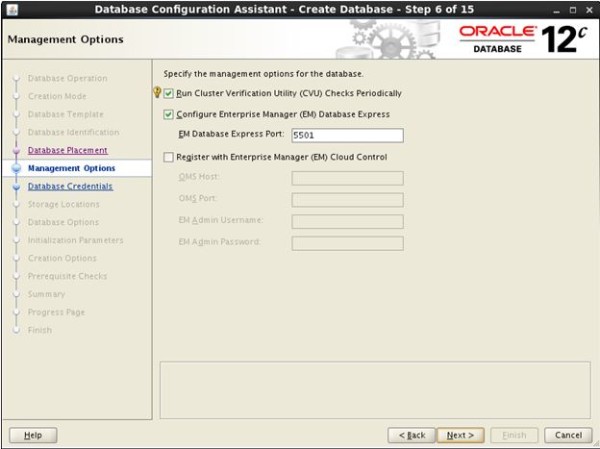
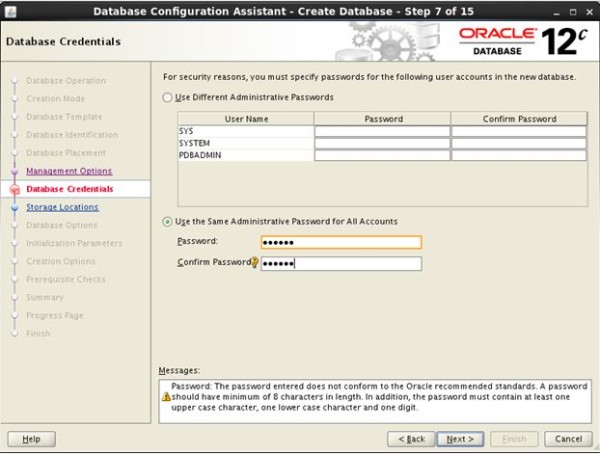

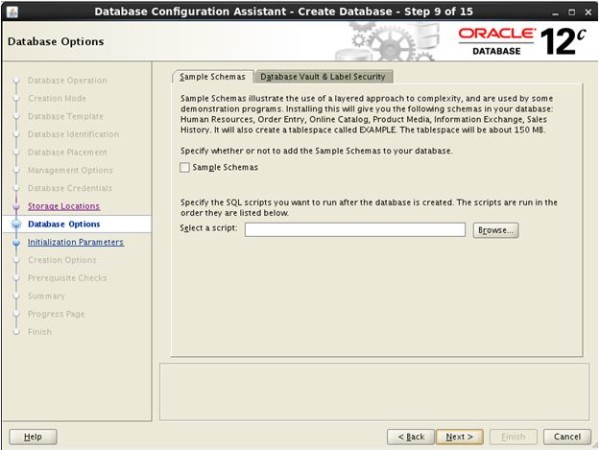
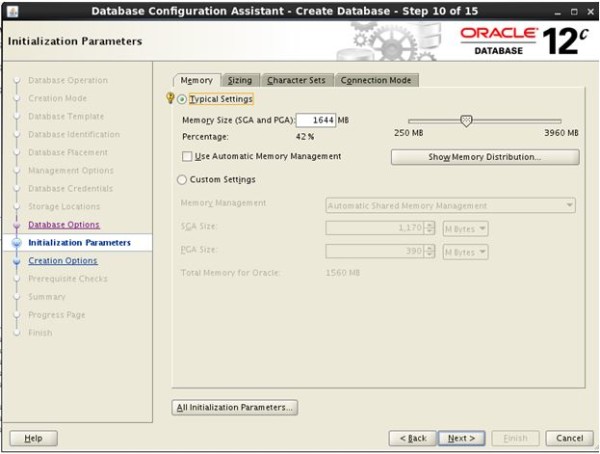


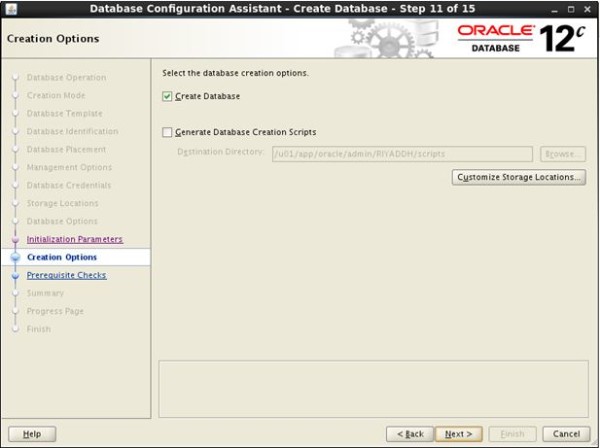

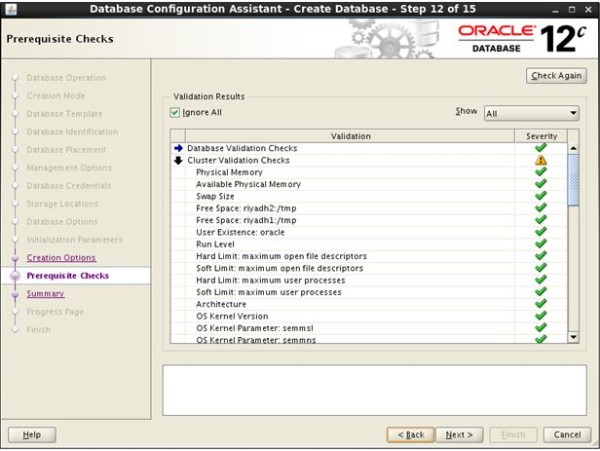
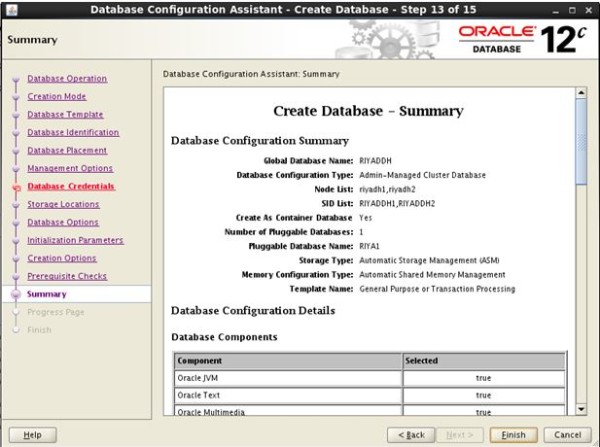
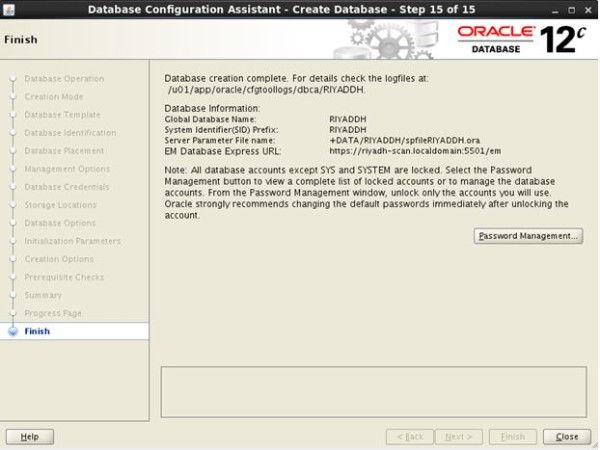
Now your oracle database with 2 node RAC is ready.
Thank you for giving your valuable time to read the above information.
If you want to be updated with all our articles send us the Invitation or Follow us:
Skant Gupta’s LinkedIn: www.linkedin.com/in/skantali/
Joel Perez’s LinkedIn: www.linkedin.com/in/SirDBaaSJoelPerez
Anuradha’s LinkedIn: https://www.linkedin.com/in/dbaanuradhamudgal/
LinkedIn Group: Oracle Cloud DBAAS
Facebook Page: OracleHelp

Pingback: Oracle RAC 12c Setup Using Virtual Box - SSWUG.ORG